
An Online Store product is anything customers can purchase through your tournament’s Online Store.
Products can be used for sponsorships, merchandise, mulligans, raffle tickets, dinner tickets, contest entries, volunteer registrations, waitlists, and other optional purchases.
Each product has its own price, quantity, description, category, purchase settings, and optional product choices.
Before you create a product
Create the Product Categories you need before adding products. Categories organize related products in your Online Store and appear as choices when you create a product.
You can also create Product Email Templates before adding products. This is optional and is needed only when you want to send a customized email after a particular product is purchased.
Add a product
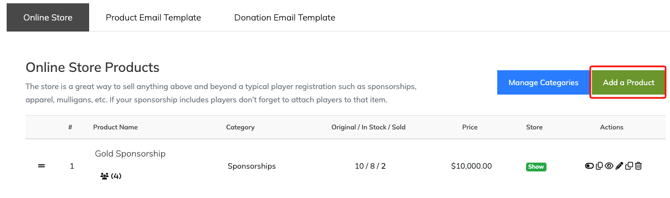
- Go to Finances & Commerce > Online Store.
- Select Add a Product.
- Complete the Product Details, Store Details, Email Template, and Product Options sections as needed.
- Review the product.
- Select Create Product.
Complete the Product Details
The Product Details section controls the product information customers see in the Online Store.
| Setting | What it controls |
|---|---|
| Product Name | The name displayed to customers, such as Gold Sponsorship or Mulligan Package |
| Price | The amount charged for the product |
| Product Image | The image representing the product in the Online Store |
| Product Category | The group under which the product appears |
| Description | Information explaining what the product is or what the purchase includes |
Use a clear product name that tells customers exactly what they are purchasing.
The description can include details such as:
- what is included;
- how the product will be used;
- redemption or pickup instructions;
- relevant dates or restrictions; and
- what the purchaser should expect after checkout.
The product description supports up to 2,000 characters.
Configure the Store Details
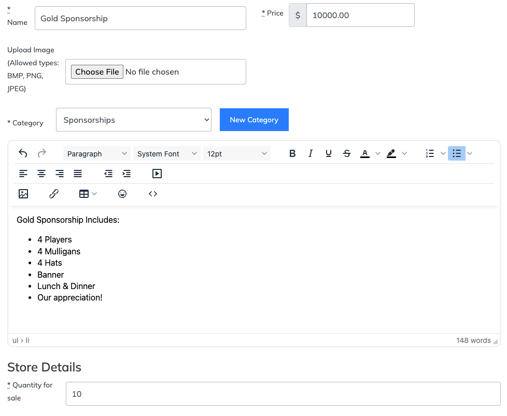
The Store Details section controls inventory and what happens during the purchase.
| Setting | What it controls |
|---|---|
| Quantity | The total number available for purchase |
| Maximum Quantity | The maximum number one customer can purchase in a transaction |
| Enable Fee's | Determines whether enabled fees are collected on the product purchase |
| Who is this item for? | Adds a field asking the purchaser who will receive or use the item |
| Upsell | Shows the product to prospective purchasers before they complete checkout |
| Is this product a Sponsorship? | Collects company, website, and logo information for a sponsorship |
| Include free player registrations with purchase? | Includes one or more player registrations with the product |
Quantity
Enter the total number of products available for sale.
For example, enter 18 when selling one sponsorship for each hole, or 100 when selling a limited number of dinner tickets.
Inventory is reduced as products are purchased.
Maximum Quantity
Use the maximum quantity setting when you need to restrict how many units can be purchased in one transaction.
When a custom maximum is not selected, Event Caddy uses a default maximum of 10 products per transaction.
Enable Fee's
Select this setting when enabled fees should be collected on the product purchase.
Fees must first be configured under My Event > Event Setup & Settings. See Understanding Fees & Rates in Event Caddy.
Ask who the item is for
Use this setting when the purchaser may be buying the product for another person.
Selecting it adds a Who is this item for? field to the purchase.
This may be useful for:
- dinner tickets;
- merchandise;
- contest entries;
- gifts; or
- purchases made on behalf of another attendee.
Make the product an upsell
An upsell product is shown to prospective purchasers before they complete checkout.
This can be useful for optional purchases such as:
- mulligans;
- raffle tickets;
- contest entries;
- merchandise; or
- additional dinner tickets.
Set the product up as a sponsorship
Select Is this product a Sponsorship? when the Online Store product represents a sponsorship.
This allows the purchaser to provide sponsorship information during checkout, including a company name, website address, and logo.
Important: A Sponsor is added automatically under Event Website > Sponsors only when the purchaser uploads a logo during checkout. The Sponsor is hidden by default until it has been reviewed and made visible.
For a full explanation of the sale and display workflow, see Selling Sponsorships vs. Displaying Sponsors.
Include player registrations
Select Include free player registrations with purchase? when the product includes one or more golfers.
After selecting the setting, choose the number of player registrations included with the purchase.
This is commonly used for sponsorships that include golfers, but it can be used with other Online Store products when appropriate.
Important: Player registrations included with an Online Store product count toward the tournament’s maximum player capacity.
Assign a Product Email Template
The Email Template section is optional.
Use it when you want every purchaser of this product to receive a customized follow-up email.
To assign one:
- Select Send an email after this product gets purchased?
- Choose the Product Email Template from the list.
The template must already exist before it can be selected.
Product Email Templates can be used for information such as:
- redemption instructions;
- merchandise pickup details;
- sponsorship next steps;
- ticket information; or
- instructions that apply only to that product.
Add Product Options
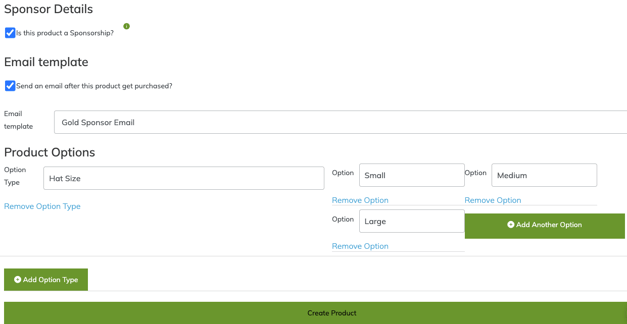
Product Options allow customers to choose from different versions of a product.
For example, a golf glove might have:
| Option type | Available choices |
|---|---|
| Size | Small, Medium, Large, Extra Large |
| Colour | Black, White, Blue |
To add Product Options:
- Enter the first Option Type, such as Size.
- Add the available choices.
- Select Add Another Option to add another choice to the same Option Type.
- Select Add Option Type when the product needs another type of choice, such as Colour.
Only add Product Options when the purchaser must choose between different versions of the same product.
Review and create the product
Before creating the product, confirm that:
- the product name is clear;
- the price is correct;
- the appropriate Product Category is selected;
- the description explains what is included;
- the available and maximum quantities are correct;
- any applicable fees, upsell, sponsorship, or player settings are selected;
- the correct Product Email Template is assigned; and
- all Product Options are complete.
Select Create Product when the setup is complete.
The product will then appear under Finances & Commerce > Online Store, where you can review and manage it.