
EventCaddy PRO allows you to sell sponsorship packages through your tournament’s Online Store.
A sponsorship is created as an Online Store product and can have its own price, description, quantity, image, and included player registrations. Selecting Is this product a Sponsorship? also allows EventCaddy to collect sponsor information during checkout.
Common sponsorship packages include:
- Hole Sponsor
- Gold Sponsor
- Silver Sponsor
- Cart Sponsor
- Dinner Sponsor
- Putting Contest Sponsor
Before you begin
Before creating a sponsorship, confirm that:
- your tournament has EventCaddy PRO;
- at least one payment option is enabled;
- you have created the Product Category you want to use; and
- you know whether the sponsorship includes player registrations.
A Product Category called Sponsorships can be used to group all sponsorship packages together in the Online Store.
Create the sponsorship
- Go to Finances & Commerce > Online Store.
- Select Add a Product.
- Enter the sponsorship’s product details.
- Select Is this product a Sponsorship?
- Include player registrations when the sponsorship includes golfers.
- Review the remaining product settings.
- Select Create Product.
For complete explanations of shared settings such as price, quantity, image, description, fees, and Product Options, see Creating Online Store Products.
Name the product carefully
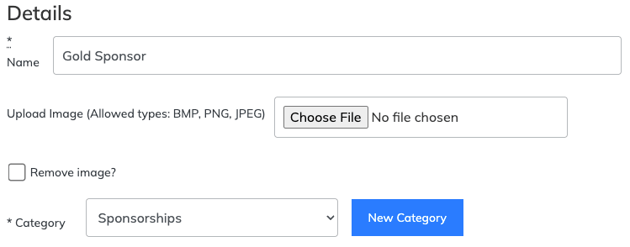
The Online Store product name identifies the sponsorship package being purchased.
Examples include:
- Gold Sponsor
- Silver Sponsor
- Bronze Sponsor
- Hole Sponsor
- Cart Sponsor
The product name is also important because it determines the Sponsor Category used when a purchaser uploads a logo during checkout.
For example:
| Online Store product name | Automated Sponsor Category |
|---|---|
| Gold Sponsor | Gold Sponsor |
| Silver Sponsor | Silver Sponsor |
| Hole Sponsor | Hole Sponsor |
Important: If you manually create Sponsor Categories before sponsorships are purchased, name each Sponsor Category exactly the same as its corresponding Online Store product. This prevents EventCaddy from creating a second category for the same sponsorship package.
For example, when the Online Store product is named Gold Sponsor, manually create the Sponsor Category as Gold Sponsor, not Gold Sponsors or Gold Level.
Sponsor Categories can be renamed and rearranged later under Event Website > Sponsors.
Configure the sponsorship setting
Select Is this product a Sponsorship? in the Store Details section.
This allows the purchaser to provide:
- company or sponsor name;
- website address; and
- sponsor logo.
The sponsorship setting connects the Online Store purchase workflow with the Sponsors area used for recognition on the Tournament Website.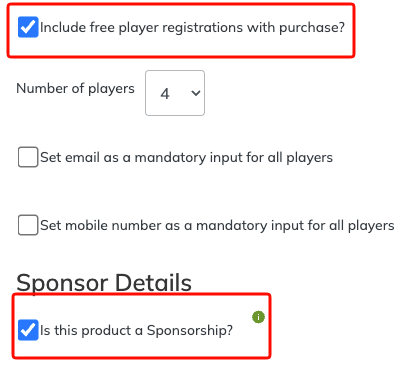
Include player registrations
Some sponsorships include one or more golfers.
To include players:
- Select Include free player registrations with purchase?
- Choose the number of player registrations included.
- Complete the remaining product settings.
- Create or save the product.
For example:
| Sponsorship | Possible included players |
|---|---|
| Hole Sponsor | 0 |
| Silver Sponsor | 2 |
| Gold Sponsor | 4 |
The number of players depends on what your sponsorship package includes.
Important: Players included with an Online Store product count toward the tournament’s maximum player capacity.
When the tournament reaches its maximum player capacity, Online Store products that include players may no longer be available for purchase.
What happens during checkout?
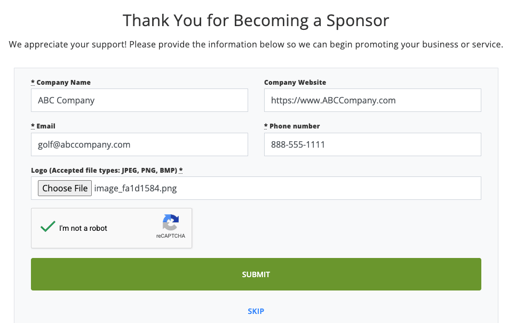
When a customer purchases an Online Store product set up as a sponsorship, EventCaddy asks for sponsor information during checkout.
The exact point at which this information is collected depends on the payment method:
- For cash or check, the sponsor-information step appears after the purchaser selects the payment method.
- For Stripe or PayPal, the sponsor-information step appears after payment succeeds.
Uploading a logo is what triggers the automatic connection to the Sponsors area.
What happens when a logo is uploaded?
When the purchaser uploads a logo:
- EventCaddy creates a Sponsor under Event Website > Sponsors.
- The Sponsor is assigned to a Sponsor Category based on the Online Store product name.
- The Sponsor is hidden by default.
- The organizer reviews the Sponsor’s information and logo.
- The organizer makes the Sponsor visible when it is ready to appear on the Tournament Website.
The automatic Sponsor record may include the submitted sponsor name, website address, logo, and information associated with the sponsorship purchase.
What happens when no logo is uploaded?
When the purchaser does not upload a logo, EventCaddy does not automatically create a Sponsor under Event Website > Sponsors.
The sponsorship purchase and transaction are still recorded, but the organizer must manually add the Sponsor if they should receive recognition on the Tournament Website.
This prevents incomplete Sponsor records from being created without a logo.
Product Categories vs. Sponsor Categories
Product Categories and Sponsor Categories are separate.
| Category | Purpose | Example |
|---|---|---|
| Product Category | Groups products for sale in the Online Store | Sponsorships |
| Sponsor Category | Groups Sponsors displayed on the Tournament Website | Gold Sponsor |
A Product Category called Sponsorships might contain several Online Store products:
- Gold Sponsor
- Silver Sponsor
- Bronze Sponsor
When logos are uploaded, each Sponsor is placed into the Sponsor Category that matches the purchased product name.
Product Categories are managed under Finances & Commerce > Online Store > Manage Categories.
Sponsor Categories are managed under Event Website > Sponsors.
Review sponsorship purchases
To see who purchased a specific sponsorship:
- Go to Finances & Commerce > Online Store.
- Locate the sponsorship product.
- Select the Consumer Reports icon.
- Review or export the transactions.
To review transactions from across the tournament, go to Finances & Commerce > Transaction History.
For full product-management and reporting instructions, see Managing Online Store Products.
Frequently Asked Questions
Should sponsorships be created as Registration Packages?
Usually, no.
Sponsorships should normally be created as Online Store products so you can manage their price, inventory, reporting, sponsor information, and optional included players through the Online Store.
A sponsorship that includes golfers can include player registrations without becoming a Registration Package.
Does purchasing a sponsorship always create a Sponsor?
No.
A Sponsor is created automatically only when the purchaser uploads a logo during checkout.
When no logo is uploaded, the organizer can manually add the Sponsor under Event Website > Sponsors.
Are automatically added Sponsors visible immediately?
No.
Sponsors created through checkout are hidden by default so the organizer can review the logo and other submitted information before displaying it publicly.
Why was a new Sponsor Category created?
EventCaddy uses the Online Store product name as the Sponsor Category name when a logo is uploaded.
A separate category may be created when an existing manually created Sponsor Category does not exactly match the Online Store product name.
Can I change the Sponsor Category later?
Yes.
Sponsor Categories can be renamed and rearranged under Event Website > Sponsors.
Review the Sponsors assigned to the category after making changes.
Can a sponsorship include golfers?
Yes.
Select Include free player registrations with purchase? and choose how many player registrations are included.
Can a Sponsor be added without an Online Store purchase?
Yes.
Sponsors can be added manually under Event Website > Sponsors, regardless of how they paid or contributed.
Can I send a private link for a specific sponsorship package?
Yes. A Sponsorship Product is a type of Store Product. You can hide the Sponsorship Product from the public Online Store, then select Copy Link under Actions to share that specific package directly with a sponsor.