
Event Caddy's Email Blast tool lets you send emails to contacts associated with your tournament.
There are two Email Blast types: One Time Email for general communication and Player Registration Email for encouraging prospective players to register. Both start from the same Email Blast Wizard and use the same general process for selecting recipients, composing the message, previewing, testing, and submitting the email for approval.
Choose the Right Email Type
| Email type | When to use it |
|---|---|
| One Time Email | General announcements, tournament updates, reminders, sponsor or volunteer information, thank-you messages, post-tournament highlights, and other communication to selected contacts |
| Player Registration Email | Promotional emails designed to encourage contacts who have not yet registered to sign up as players |
A Player Registration Email can also include an optional reminder date. Event Caddy checks player registrations each time the email is sent so contacts who have already registered are excluded.
Important: A Player Registration Email is a promotional email sent through Communication Tools. It is different from the automatic Registration Confirmation Email sent after an eligible player registers. See Customizing the Registration Confirmation Email for the after-registration email.
Start a New Email Blast
- Go to Communication Tools > Email.
- Select New Email Blast from the Email Marketing Wizard.
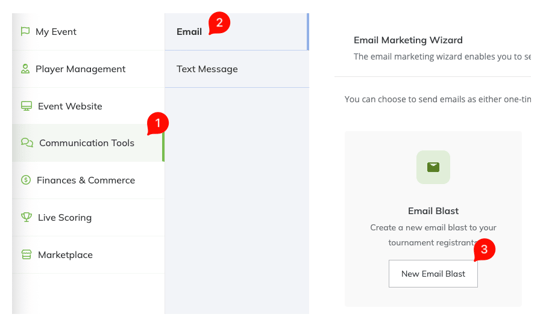
- Choose the type of email you want to create:
- New One Time Email
- New Player Registration Email
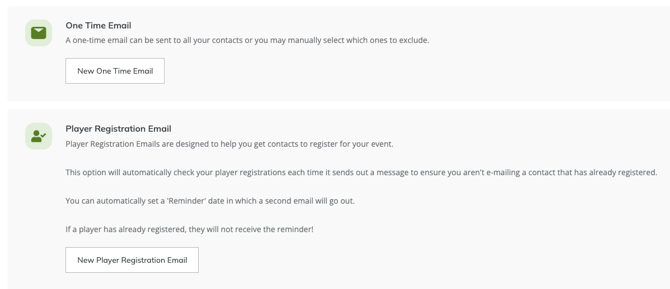
Both options continue through the same general Email Blast workflow, with additional registration-specific behavior for Player Registration Emails.
Select Your Recipients
Choose the contacts you want to receive the email.
Depending on how your contacts are organized, you can select from your Email Contact Categories or choose individual contacts.
If the contacts you need are not yet available, add or import them before continuing. See Managing Email Contacts and Categories for instructions.
When you are finished selecting recipients, select Continue.
Player Registration Email Recipients
Player Registration Emails are specifically intended for contacts who have not yet registered.
Event Caddy checks the tournament's player registrations when the email is sent and excludes contacts who have already registered.
If you schedule a reminder, Event Caddy checks registrations again before sending the reminder. A contact who registered after receiving the first email will therefore be excluded from the reminder.
Compose and Schedule Your Email
Use the email editor to create your message.
Depending on the email type, you can configure information including:
- email subject;
- sender information;
- send date;
- email content; and
- an optional reminder date for Player Registration Emails.
The content editor also includes available helpers that can insert information such as recipient or tournament details into your message.
For a Player Registration Email, select a reminder date if you want Event Caddy to send the same Email Blast a second time to contacts who still have not registered.
When the email is ready, select Continue.
A Player Registration Email and its scheduled reminder are treated as a single Email Blast. You submit the blast for approval once; that approval covers both the original send date and the reminder date.
Preview and Send a Test Email
Before submitting the Email Blast for approval, review the preview carefully.
If you need to make changes, select Back and edit the email while it is still a draft.
You can also select Send Test Email to send yourself an actual sample of the message.
The test email is sent to the email address associated with the Event Caddy account that is currently logged in.
If you do not receive the test email:
- confirm that you are logged into the Event Caddy account associated with the email address you expect;
- check your spam or junk folder; and
- confirm that your email provider is not blocking the message.
After reviewing the test email, return to the draft and make any necessary changes before submitting it for approval.
Review and Submit the Email for Approval
Event Caddy reviews Email Blasts before they are sent.
- Review the email preview.
- Confirm the recipients.
- Confirm the Proposed Send Date.
- Select Continue when everything is correct.
- Select Submit for approval.
The send date remains proposed until the email has been approved, so submit your Email Blast far enough in advance to allow for the approval process.
Once approved, the email will send according to its scheduled date.
If an Email Blast is rejected, the Event Caddy Support team will contact you with the reason. The rejected email becomes editable again so you can make the required changes and resubmit it.
For a Player Registration Email with a reminder date, the single approval applies to both scheduled sends.
Edit an Existing Email Blast
Whether an email can be edited depends on its current status.
| Email status | Can it be edited? |
|---|---|
| Draft | Yes |
| Pending Approval | No |
| Approved | No |
| Rejected | Yes |
If an email is still a Draft, open it and make your changes normally.
Once an email has been submitted and is Pending Approval, it cannot be edited. If you need to change it, you can delete the pending Email Blast and create another, or contact Event Caddy Support to have it rejected so it becomes editable again.
Once an email has been Approved, it can no longer be edited. If the approved email needs to be replaced, delete it and create a new Email Blast with the corrected information.
Reuse a Previous Email Blast
Event Caddy does not currently have a standard duplicate-email function.
If you want to reuse the design or content of a previous Email Blast, you can copy its source code into a new email:
- Open the previous Email Blast.
- Go to the Email Content editing stage.
- Select Source Code in the content editor.
- Copy all of the source code.
- Create a new Email Blast.
- Open Source Code in the new email's content editor.
- Paste the copied source code.
- Save the content and make any changes needed for the new message.
Review and test the new Email Blast carefully before submitting it for approval, especially if dates, links, tournament details, or other time-sensitive content were copied from an older email.
Add Images or Files to an Email
Event Caddy does not support traditional file attachments on outgoing Email Blasts.
There are two alternatives depending on what you want recipients to receive.
Add an Image Directly to the Email
Images can be uploaded and displayed directly inside the Email Blast.
Use the image option in the content editor to upload an image from your computer or insert an image that is already available by URL.
If you have a flyer, poster, or other primarily visual document, you can also convert it to an image format such as JPEG or PNG and insert that image into the email.
When sizing an image, using a percentage for the width and leaving the height blank can help the image adapt to different screen sizes.
Link to a PDF, Word Document, Form, or Other File
For a document that recipients need to open or download:
- Go to Event Website > Website Editor > Downloadable Files.
- Upload the file.
- Find the uploaded file's File URL.
- Copy the File URL.
- Return to your Email Blast.
- Highlight the text or image you want recipients to select.
- Use the link option in the email editor and paste the File URL.
The recipient can then select the link in the email to open or download the file.
For more information about uploaded files, see Can I create downloadable files on my tournament site?.
Request Email Delivery and Open Statistics
Email Blast analytics are not currently available directly to tournament organizers inside Event Caddy.
If you need statistics for a recently sent Email Blast, contact Event Caddy Support using the chat icon or email support@eventcaddy.com.
Support can provide available information including:
- delivery or successful-send information; and
- reported email opens.
Statistics are available for up to one week after the Email Blast is sent.
Email open information is not absolute. Not every recipient's email service reports an open, so the number of recorded opens may be lower than the number of people who actually viewed the message.
Frequently Asked Questions
Why can't I see the Continue button when editing my Email Blast?
This can happen when pasted content is not immediately recognized by the Email Blast editor, particularly while editing an existing blast.
Try typing a character into the Subject or Sender Name field and then deleting it. This can trigger the editor to recognize the updated content and display the Continue button.
How do I send an email to all of my registered players?
First make sure your registered players are available in your email contacts.
Go to Communication Tools > Email > Import Contacts and import the current Player List, then create a One Time Email and select those contacts as recipients.
If you already have other contacts mixed into your email list, you can instead organize registered players into their own Email Contact Category.
See Managing Email Contacts and Categories for the complete contact workflow.
Where does a Send Test Email go?
The test email goes to the email address associated with the Event Caddy account currently logged in.
If it does not arrive, check the spam or junk folder before troubleshooting further.
What's the difference between a Player Registration Email and a Registration Confirmation Email?
A Player Registration Email is a promotional Email Blast created under Communication Tools > Email to encourage contacts who have not yet registered to sign up.
A Registration Confirmation Email is automatically sent after an eligible player registers and is configured under Player Management > Registration Options > Registration Email.
See Customizing the Registration Confirmation Email for that workflow.
Related Articles
- Communications Overview
- Managing Email Contacts and Categories
- Customizing the Registration Confirmation Email
- Can I create downloadable files on my tournament site?